Saturday, December 29, 2012

House Mountain from Beaverhead Flat Road


Nine Skyliners hiked on Forest Road 9952 and 9952C from Beaverhead Flat Road to House Mountain on 29 December 2012. From Cottonwood, we drove north on Hwy 89A, turned right (east) on Cornville Road and followed it for 8.2 miles, passing through Cornville, turned left onto Beaverhead Flat Road and followed it for 2.7 miles to arrive at the turnoff to FR 9952 (on the left). We drove for about one mile on FR 9952 before parking to start our hike.

After donning our packs, we paused for a group photograph.

Left to right: front row: Dolly Yapp, Kwi Johnson, Miriam Sterling and 
Betty Wolters; back row: Mike Sterling, Mark Purcell, the author and Jim 
Manning - photograph by the ninth hiker using the author's camera
The section of road shown in the photograph (right) exemplifies the condition of the road along which we would hike all the way to the top of House Mountain. Although it was a little rockier and a good bit steeper in places than shown here.  As can be seen here, the road was bathed in sunlight when we started our hike; however, that soon changed, for the sun was blocked by a steep hill on our right as we traveled deeper into the wash that would lead us up the mountain toward our goal. The lack of sun coupled with a gentle, but chilly, breeze that blew steadily at our backs caused us to move briskly along in an effort to keep warm. As a result we made very good time and an hour and a half from the time we started our hike we were at Trick Tank (or as it is marked on my map, “Horse Mountain Trick Tank”).

The following photograph, taken from the catchment area, shows a fairly new galvanized tank (left) and an older rusty one (right).

Metal tanks located at Trick Tank
The trough leading to the top of the galvanized tank carries runoff from the catchment area; the pipe from the top of that tank carries overflow to the rusted tank seen behind the tree. At the time of my last previous hike to House Mountain, about six years ago, the galvanized tank had not yet been installed and the catchment area consisted of two long runs of metal roofing, mounted parallel to one another on the hillside and slanted to the middle so that all water ran to the center and then downhill to be collected in a single rusty metal tank. The old roofing sections have since been replaced by an expanded catchment area that is composed of a layer of asphalt, or possibly plastic sheeting, covered with a layer of gravel and the galvanized tank shown in the photograph (above) has been added.

We paused at the tank for a mid-morning snack before continuing on toward the top of House Mountain. We still had two miles to go, one to the FR 9952C turnoff and another to the top. We were long since out of the shadow of the hill and it was a little warmer, but not much, as a thin layer of clouds had drifted across the sky and now filtered the sun. Consequently we continued to move along at a good pace and were soon at the summit.

Hiker Mark Purcell eating lunch on the summit, elevation 5154 feet
From his perch on the summit (above) Mark could see in all directions. Looking to the north, he had a clear view of the sun-drenched, snow- capped San Francisco Peaks.

Humphreys, Agassiz, Fremont and Doyle Peaks lined up left to right 
– slightly enlarged photograph
To the west, across the Verde Valley, Mingus Mountain brooded in the thin sunlight that filtered its way through the overcast sky.

Mingus Mountain seen from House Mountain
As measured by my GPS track (see map on next page) we had hiked 4.8 miles one way and climbed 1470 feet to reach the summit.


Saturday, December 22, 2012

Spirit Hunter Petroglyph and V Bar V


Eleven Skyliner hikers visited the Spirit Hunter Solar Petroglyph1 Site at the top of Blue Grade (Beaver Creek) Road and the V Bar V Heritage Site at Wet Beaver Creek on 22 December 2012. To reach Spirit Hunter, we traveled north on I-17 to the Stoneman Lake Exit, turned east on Stoneman Lake Road and followed followed it 0.8 miles before turning south on FR 689 (otherwise known as Blue Grade Road and also as Beaver Creek Road). We followed FR 689 for 3.4 miles before turning east and traveling 0.3 miles to park at a cinder pit close to the rim of Rarick Canyon. We then hiked south along the rim of the canyon for about 0.2 miles and descended to a ledge which we followed (going east at this particular point) for some seventy-five yards to arrive at the petroglyph. This route from FR 689 to the petroglyph is shown on the map (right).

A faint path marks the way from where we parked to the descent from the rim of the canyon. After a short, steep climb of about ten feet down from the rim, we followed the rocky, cactus infested ledge close along the rim to the solar petroglyph, crawling between the branches of a pinon tree (left) along the way.

Looking straight down from the ledge we were on, we could see the dry streambed in the bottom of Rarick Canyon. Eight-tenths of a mile downstream is where Mullican Canyon joins Rarick, and seven-tenths of a mile southeast (bearing 145° true) lies the Indian Ruins we visited just over a year ago on the rim of Mullican. However we could not see that site from here.

We passed several other petroglyphs on our way to spirit Hunter.

Petroglyphs seen along a ledge on the west wall of Rarick Canyon
We reached the Spirit Hunter Petroglyph (below) shortly after noon.

Spirit Hunter Solar Petroglyph
The appearance of this “calendar” at significant times of the year is illustrated at the Sinagua Sunwatchers website2.

I scrambled several yards further along the ledge to reach a sharp point jutting out from the canyon wall. Lila, meanwhile, had gone back to where we descended from the rim to escort another hiker, who had belatedly decided to descend and join the rest of the group, along the ledge to the solar petroglyph where we would eat lunch. In the below photograph, she is shown returning to the petroglyph, which is hidden by the trees shown at right.

Lila moving along the ledge – photograph taken from a sharp point jutting 
from the canyon wall beyond the solar petroglyph
I had not yet reviewed the Sinagua Sunwatchers website, so we examined the petroglyph and tried, without much success, to decide for ourselves what it would look like during an actual solstice. We then perched on the sun-splashed rocks for lunch.

Left to right: Dolly Yapp, Lila Wright (red jacket), Kwi Johnson, George Everman, 
Colleen Maktenieks and Betty Wolters (peering around rock) – not shown are 
Jim Manning, Gary Brooks, Betsy Fader and Daisy Williams
– photograph by the author
After lunch, we made our way back along the ledge, climbed to the rim and hiked back to the parked cars.

We then decided that rather than return to I-17 for the descent to Verde Valley from the Mogollon Rim, we would take FR 689, a well-maintained dirt road. This road follows the rim of Rarick Canyon, passing Watermelon and Blue Grade Tanks along the way, down into Verde Valley and connects with FR 618. Turning east on FR 618, we followed it for 2 miles before turning into the V Bar V Heritage site at Beaver Creek.
The land at this site was “settled by Benjamin Franklin Taylor and his wife, Florence Newman Taylor. Ben Taylor's cattle were branded with the '100' brand, and the ranch became known as the '100 Place.'"3

The property passed through various owners until, “in 1927, James and Ida May Swift Minotto (of the Swift Meat Packing family), along with partners, C.C. "Whitey" Montgomery and Omer Maxwell, bought the 100 Place and a number of other small holdings, and formed the V Bar V Cattle Company.4

The V Bar V brand “was first recorded by A.W. Bradford of Flagstaff in 1907,” passed to “C Montgomery of Camp Verde and in 1926, it was recorded to Ida May Swift Minotto. When the Minottos formed their cattle company in 1927, the V Bar V brand was chosen as the most simple and easy to use.” The brand is now owned by the University of Arizona, under which it operates a 71,000-acre Agricultural Experiment Station.5

The V Bar V Heritage Site, acquired by the Forest Service in 1994, is the largest known, and one of the best-preserved, petroglyph sites in the Verde Valley. It is said to contain more than a thousand petroglyphs in some thirteen separate panels.

A description of the site along with entrance fees and hours of operation is provided on the Coconino National Forest website at:

http://www.fs.usda.gov/wps/portal/fsinternet/!ut/p/c5/04_SB8K8xLLM9MSSzPy8xBz9CP0os3gDfxMDT8MwRydLA1cj72BTSw8jAwgAykeaxcN4jhYG_h4eYX5hPgYwefy6w0H24dcPNgEHcDTQ9_PIz03VL8iNMMgycVQEAIzTHkw!/dl3/d3/L2dJQSEvUUt3QS9ZQnZ3LzZfME80MEkxVkFCOTBFMktTNUJIMjAwMDAwMDA!/?ss=110304&ttype=recarea&recid=55424&actid=119&navtype=BROWSEBYSUBJECT&position=BROWSEBYSUBJECT&navid=110355000000000&pnavid=110000000000000&cid=null&pname=Coconino+National+Forest+Recreation+-+V-Bar-V+Heritage+Site
A spacious parking lot, is provided at the site, just 0.2 miles from FR 618. The visitors center, located alongside the creek near the old V Bar V winter headquarters site, is just ahead. The chimney from the old ranch house still stands, a silent witness to bygone days.

Old ranch house chimney at V Bar V winter quarters
Examining the chimney close up from a different angle reveals the V Bar V brand embedded in the vine-shrouded outside structural wall (right).

After checking in at the visitor center, we proceeded along the smooth, packed-sand surface of the trail leading to the petroglyphs, only 0.4 miles away.

A guide was available at the site to explain the meanings of some of the petroglyphs and how some of them were used to determine the seasons. Rather than try to remember his words, I will just show a photograph of a posted explanatory sign and follow that with a photograph of the “calendar.” The drawings thought to be significant in marking the seasons - when to plant crops, when to hold ceremonies, etc, are highlighted in Yellow. Look carefully and you can find them in the photograph below.

Posted explanatory sign
Petroglyph calendar at the V Bar V Heritage Site
The sun shines on the wall through a cleft in the rock, as shown in the lower right picture included on the explanatory sign (see Posted explanatory sign above) to highlight the various features pointed out in the sign. A photograph of the cleft (see arrow) is shown below.

Cleft through which the sun highlights various calendar features
The petroglyphs shown above were, I thought, the most impressive at the site, although there are many others to be seen.

Leaving the V Bar V Heritage Site, we split into two groups, four of us headed home while the remaining seven visited nearby Sacred Mountain.

Our travels from the I-17 Stoneman Lake Exit to the Spirit Hunter Petroglyph and on to the V Bar V Heritage Site are shown by GPS track on the below map (below).


1Name supplied by Lila Wright, Skyliner leader; no other reference found
2http://www.sinaguasunwatchers.com/tour/tour-3.htm
3http://cals.arizona.edu/aes/vbarv/historytimeline.html
4Ibid

5http://cals.arizona.edu/aes/vbarv/brandhistory.html

Monday, December 10, 2012

North Wilson Trail


Twelve hikers gathered at the Encinoso trailhead on 20 October 2012 for a day's hiking on Wilson Mountain. The trailhead is located at the entrance to Encinoso Picnic Area and features a paved parking area for several cars and available toilet facilities. It is 5.8 miles north on Hwy 89A from the Hwy 179/Hwy 89A traffic circle in Sedona.

I am told that the picnic area is the site of an old orchard whose owners sold fruit to passersby on the, then dirt, road that ran up the canyon from Sedona to Flagstaff. In fact, I understand that a descendant of the family that owned the orchard currently lives in Flagstaff and is a member of the R2R hiking group.

The below group photograph was taken when we returned to the trailhead at the end of our hike.

Left to right (back row): Gary Jacobson, Donna Davis, Betty Wolters, 
Miriam Sterling and Jerry Helfrich; middle row: Donna Goodman, 
Anita Jackson and Dolly Yapp; front row: Lila Wright, 
Daisy Williams, the author and George Everman
A thirteenth hiker, not shown above, started the hike with us, but soon discovered that she was still suffering from a recent bout with pneumonia. She wisely turned back.
Our goal was to take North Wilson Trail 123 to the intersection with Wilson Mountain Trail 10 on what is called the “first Bench” and is about two-thirds of the way up the mountain. We would then continue to the top, turn left at the top and follow the rim for about one-half mile southeast to the Sedona Overlook.

As we left the parking area we encountered a sign that provided us with the general layout of the trails we would be hiking.

Posted sign showing trail layout
The trail starts by leaving the parking area leading north alongside Hwy 89A. At the trail sign (right). It turns to the northwest to climb to the crest of a ridge a few yards ahead. It then climbs steeply up the mountain following, for a time, along the ridge crest. This was a fairly strenuous start, as illustrated below, to what we expected to be a very strenuous hike.

Starting our with a strenuous climb up the crest of a ridge
Looking back across Oak Creek Canyon, we were struck by a gleaming white layer of limestone sandwiched between the sandstone layers. Two other, thinner, limestone layers appear just above it.

White bands of limestone in the cliff wall across the canyon
The effects of the 2006 Brins fire were still quite visible in the form of charred, dead trees, many of them now fallen. On the other hand, signs of forest recovery were all about us. The photograph below nicely captures both the destruction, as shown by the dead trees, and the recovery, as shown by the oaks, still green with summer foliage, and the sumacs, now displaying their brilliant fall colors.

Dead trees, live green oaks and brilliant red sumacs
After climbing up the crest of the ridge, we enjoyed a reprieve from hard climbing as the trail would its way along a canyon wall at a fairly gentle slope, at least gentle enough as not to require switchbacks or steps, before becoming steeper and climbing directly up the canyon wall with the help of several switchbacks and rock steps.

The forest was little changed along this section from what we had already seen. We continued to see burned, dead trees scattered among the vibrant signs of a recovering forest. At one point the yellowish-red fall foliage of a maple contrasted with the surrounding red of sumac and the green of oaks.

Maple in center, sumacs below
Along the way we also found a deerbush (left) in full bloom. It looks very much like a white version of the purple lilacs commonly used in yards and gardens for ornamental purposes. I suppose one could accurately call it a white lilac; it is, after all, a member of the lilac family.

We eventually turned to climb the canyon wall, and the going became more difficult, with a steep incline and and many switchbacks.
As we neared what is called the first bench, we could look to our right and see a white intrusion in the red sandstone at the top of the mountain. It looked very much like a swirl of vanilla in a scoop of chocolate ice cream.

White intrusion in the red rock
When we reached the north end of the first shelf, we found that we had climbed around 1350 feet from the trailhead. It was another half-mile to the junction with Wilson Mountain Trail, but the going was easy, essentially level along a firm, well marked trail. When we reached the junction (sign at right), we still had almost 900 feet to climb and some of the hikers choose to stop here for lunch and then make a leisurely descent to wait for us at the trailhead.

The rest of us trudged on up the trail, finding it somewhat easier than than we had expected. There were numerous lengthy switchbacks, making the climb generally less steep than the last part of the trail up to the first shelf had been.

The fork in the trail, where one turns south along the rim to the Sedona overlook, is rather easy to miss if one is not careful. A large fallen log lies alongside the trail and one must turn sharply at the end of the log to take the trail to the overlook. A sign is posted (left), but it is easy to miss among the trees.

From the fork it was an easy half-mile to the Sedona Overlook. By the time we arrived there, it was about 1300 and we were all famished.

The weather was perfect, the view was great and we were hungry enough that whatever food we had brought tasted like a serving from a gourmet restaurant. In other words conditions were perfect for a quick lunch, a look at the scenery and a good long nap.

Unfortunately, some of the group were anxious to finish the hike and almost immediately started back after eating. Although the others were willing to stay and enjoy the view while I napped, I didn't want to cause anyone to have to wait too long at the trailhead, so I took one long last look out over Sedona and headed back down the trail. In a photograph taken from the overlook (below) one can see Sedona spread out below, Airport Mesa at center right, Hwy 179 making its way toward The Village of Oak Creek in the center and Hwy 89A running through West Sedona to the right.

From Wilson Mountain Sedona Overlook
The return trip went rapidly. I hiked on ahead hoping to reach the North Wilson Trail junction on first bench in time to catch a short nap before the rest of the group caught up. I was not entirely successful as they caught up before I dropped off. However, George was willing to stay for a while longer and I did finally get ten-minute nap (right). We then hurried to catch up and I was already at the trailhead when the last of the hikers arrived.

According to my GPS track, the hike was 6.8 miles round trip, the maximum elevation was 7031 feet and the total ascent was 22927 feet.

The track for this hike is shown on the included map (below).


Saturday, December 8, 2012

White Mesa Road and Red Draw Tank


The 08 December 2012 Skyliners hike was originally scheduled to be on the dirt road that climbs to the Mogollon Rim between I-17 and Rarick Canyon. That road, part of Beaver Creek Road, is called Blue Grade because of the blue granite seen along the way. However, we decided to change our schedule in order to visit a site further up Blue Grade that has Indian drawings associated with the winter solstice later this month. As a substitute for the originally scheduled hike, we chose to start at the same location but cross Rarick Canyon and hike a rocky, old road to the top of White Mesa. We would then return to Rarick Canyon and visit Indian Petroglyphs located in Red Tank Draw downstream from the crossing.

From the I-17/Hwy 179 Interchange, we drove east on FR 618 for one-half mile and turned left onto Beaver Creek Road (FR 689). We followed this road for 1.3 miles, to just below where the blue grade starts, and turned right onto FR 645A (referred to as White Mesa Road in this report), followed it for one-half mile and then turned right to park a short distance ahead near the rim of Red Tank Draw very close to where some of the petroglyphs are located.

Red Tank Draw is actually a smaller canyon formed by the stream flowing out of the mouth of Rarick Canyon. It could just as easily be called Lower Rarick Canyon.

Leaving our cars, we headed along what we took to be FR 645A, expecting to soon reach the Rarick Canyon crossing. Sadly, we failed to note that we had actually turned off the real FR 645A, perhaps a hundred yards before parking, and the road we followed ended at the stream in Red Tank Draw after a quarter of a mile. Directly across the stream from us was a sheer, red cliff, perhaps a hundred feet high.

One of our hikers had been to this spot previously with another group of hikers led by a person recognized as very knowledgeable about local history. That person informed them that this had been a sheep crossing. We saw galvanized metal bars firmly embedded in the cliff wall, and we wondered whether this might have been part of some structure designed to transport the sheep over the cliff. But that seemed unlikely, as an easy crossing existed just a short distance upstream where FR 645A crosses Rarick Canyon, and providing such an expensive structure here for that purpose would seem to be quite unnecessary. Later, viewing the area in Google Earth with a USGS overlay, I found that this was the site of an old water gaging station. This may, indeed, have been a sheep crossing, but the metal structure had nothing to do with it, and the sheep would have had to be herded either up or down the rocky streambed to reach a point where it would be possible to climb out on the other side.

Sheep crossing or not, this was obviously not the route we had intended to take across Rarick Canyon, so we retraced our steps to where we had parked and continued on past for a short distance to take the real FR 645A. Another short distance ahead, we encountered a large man-made hump in the road that would stop all but high-clearance and All-Terrain-Vehicles. The crossing itself, a little further ahead ahead, would certainly have deterred other than ATVs or the most dedicated of 4-wheelers. Despite all this, the route is marked on the National Forest map as “open to all vehicles.”

Rarick Canyon Crossing
Looking back as we left the crossing behind us, we could see Blue Grade Road snaking its way up the opposite side of Rarick Canyon.

The black arrow points to Blue Grade Road
While we were stopped to look at Blue Grade Road, we posed for a group photograph.

Left to right: Betty Wolters, Daisy Williams, Lila Wright, Dolly Yapp, 
Kwi Johnson, the author, Becky Fowsky and Gary Jacobson 
– photograph by the ninth hiker
White Mesa Road was shaded by the Mesa as we headed up the rocky, old road along its north slope. That made it pretty chilly on this December morning, and we didn't stop for our morning snack until we came to an isolated spot where the sun was peeking over the mesa. After a quick snack, we hurried right along and were soon at the saddle where our road topped out on White Mesa. We found ourselves at a fork in the road, a fork that did not show on any of the maps I had referenced. The right fork, the one not on the maps, led to the southwest, apparently making its way to White Mesa Tank visible below us. The left fork, which led higher on the mesa, was a continuation of FR 645A, the road we were following. After some thought, we took the left fork so as to have a better view of our surroundings for our lunch stop.

About a hundred yards from the fork, our road became FR 644H while a very faint road, FR 9248F, led off to the left, apparently to Rays Tank.

Forest Road 644H
Forest Road 9248F
Before stopping for lunch, we continued straight ahead on FR 644H for about another three-tenths of a mile to find a good viewpoint. We all scattered out in the grass, each looking for a spot with a soft seat and a good view. My selection was, of course, a nice patch of grass that would suffice for my traditional noon nap.

From our position high on White Mesa we had views in all directions. I was particularly struck by the views west to the Black Hills and northwest to the distant mountains beyond Sycamore Canyon.

Looking across Verde Valley to the Black Hills
Looking to the distant mountains beyond Sycamore Canyon
We didn't linger on White Mesa very long after eating lunch because five of us had decided to explore a future hike before returning home.

We watched our footing carefully on the way back down and, even though there were a number of near misses, no one took a spill. The section shown in the below photograph exemplifies the treacherous hiking surface that prevails along this stretch of White Mesa Road.

Hikers stepping carefully along the rocky slope of White Mesa
The trail was still shaded in spots on the way down, but the temperature was just about perfect for hiking.

We made it back to the crossing in short order, crossed to the other side and continued along the road for about another tenth of a mile before taking a faint trail to the left leading toward Red Tank Draw. This trail runs for around 150 yards through catclaw to fade out just short of the draw. From there, we just bushwhacked our way until we were in the rocky streambed. Our goal was to follow the stream down the draw until we came to the petroglyphs near where we were parked. The blue line in the below graphic shows our route down Red Tank Draw.

Route down Red Tank Draw
The going was rough down the draw, in some places there was water to be avoided, in others it had seeped below the rocks and the streambed was completely dry. In some places large pools had formed. All the way it was very rocky. All-in-all, though, the trip was well worth the effort. Late fall foliage was still clinging to the trees in this sheltered environment and we soon started to see petroglyphs on the canyon walls along the way.

Fall foliage in Red Tank Draw
The first petroglyphs we saw were located high on the left wall of the draw.

The first petroglyphs we saw (magnified view)
After this, we saw more and more of these as we progressed down the draw, predominately along the left wall at first, but also on the right wall farther down the draw. Additional examples are shown below.

On the left wall
Also along the left wall
On the right wall
Also on the right wall
The last two examples, shown below, are located on the right cliff wall where the trail leads up to where we were parked.

On the way out of Red Tank Draw
The last drawing as we left the draw
It was now after 1400 and, as previously noted, five of the party planned an additional excursion to scout for a future hike. This would be a visit to a 
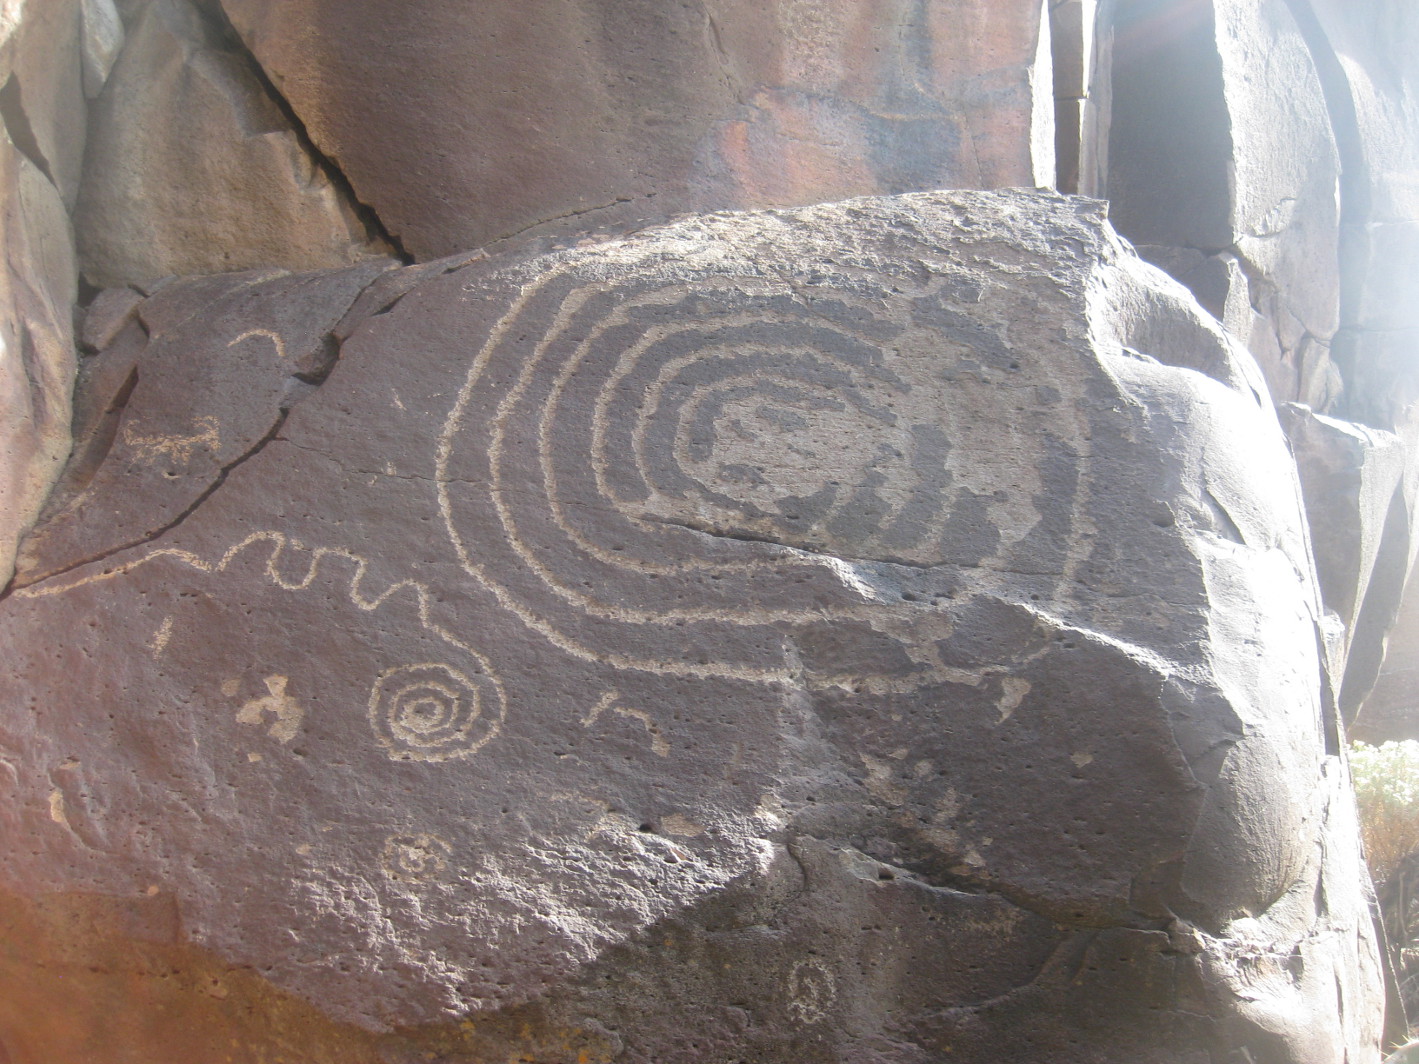
site just off Blue Grade Road at the Mogollon Rim. We knew that there were Indian solstice drawings there, just below the rim of Rarick Canyon, and wanted to make sure we knew how to reach them before scheduling an official hike.

We all piled into Becky's hummer and drove up Blue Grade road for around 4.5 miles before turning right onto another road and going a further three-tenths of a mile to park near what appeared to be a gravel pit. The drawings were nearby and we found them after only one false start, probably a new record for our scouting group.

The GPS Track for this hike is shown on the included map (below). The green line is the track we took to White Mesa, the yellow line shows a section of the road to Rays Tank and blue line shows our route down Red Tank Draw to look at petroglyphs. The round trip distance for this hike was 4.8 miles, the maximum elevation was 4902 feet and the total ascent was 1183 feet. Our travels to scout out a future hike are not shown.